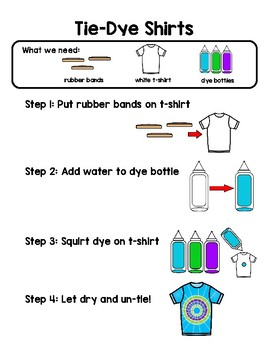
tie dye shirt steps
Plus Ill share all of the essential tips and tricks you need to know to get beautiful bright colors and. Crumple ball up scrunch or otherwise bunch up the fabric.

30 Tie Dye Designs W Step By Step Patterns Kids Activities Blog
The more you scramble the shirt the more the dye placement will be random and the less predictable the result will be.
. Folding scrunching crumpling the fabric Start with the shirt flat on a table. The t-shirt should resemble a long strip. Learn how to make beautiful and unique tie dye patterns with these easy tie dye folding techniques and step-by-step pictures.
What you do in this process is fold the fabric or cloth into a pattern. - A white t-shirt - Disposable plastic table cloth or garbage bags - Gloves - Large buckets or bowls - Fabric dye - Salt - Plastic squeeze bottles - Rubber bands - Plastic bags. See which patterns turned out and which.
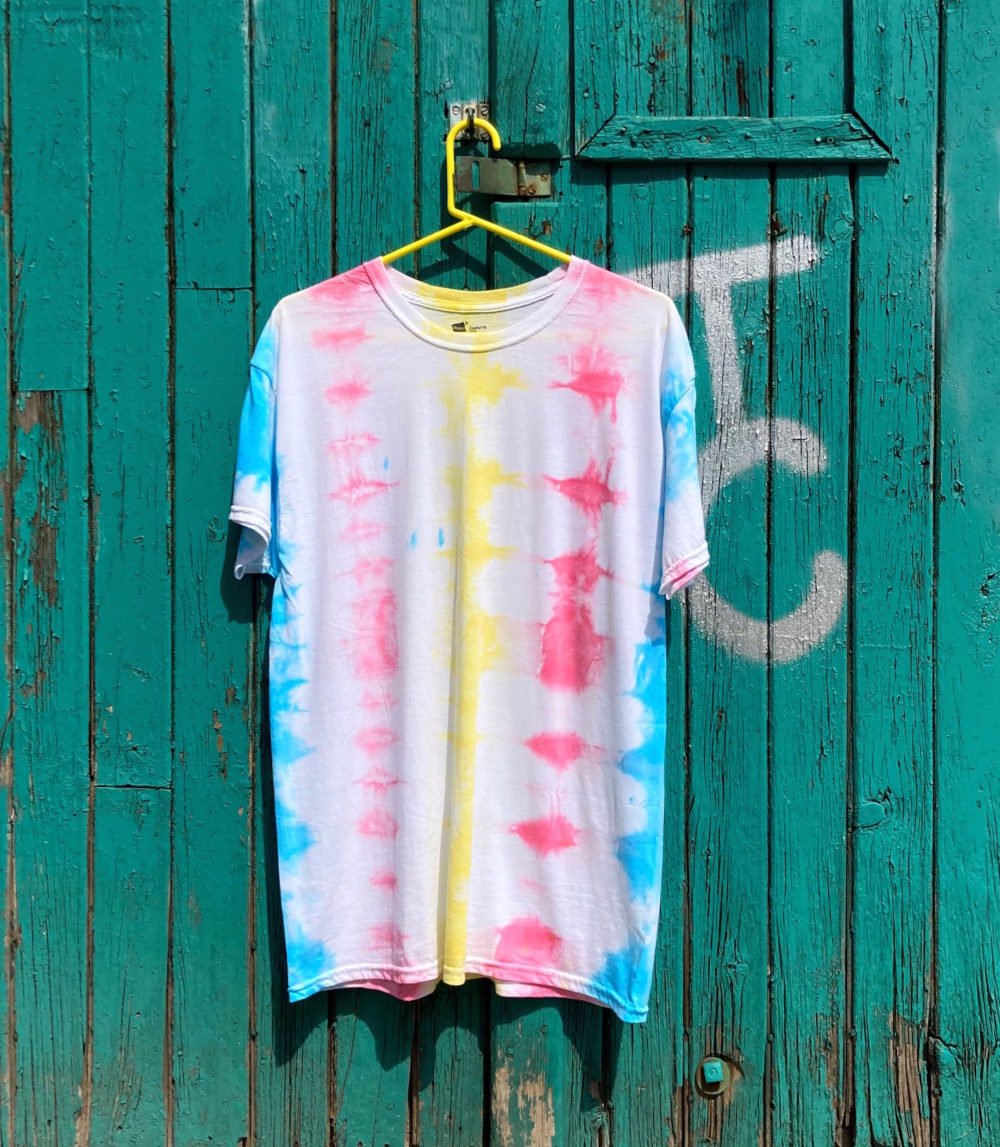
Tie-dye as the name implies consists of tying and dying a piece of clothing. You can start from the center of the shirt which is traditional or you can start the spiral anywhere you want on the shirt. Remember tie dye is all about being bright and bold so dont be afraid to do so now.
Wash It Let It Dry. Continuously turn the fabric clockwise. Bring the fabric together to create folds.
I will be opening a kit and also doing a DIY Tie-Dye with water and coloring. Pinch the very center of the tee with your dominant hand. Ice Tie Dye Method For this method the things to keep in mind are that this works best with the crumple pattern and utilizes the powder form of the dye.
And then you have to tie it with rubber bands or string. Continue pleating the fabric in this way until you get to the top. Randomness is key here.
Learn how to Tie-Dye 5 different ways. How to Tie-dye a Geode shirt step by step The geode technique can help you create all sorts of ring shapes. How to tie dye a circle t-shirt 1.
Flip your tie dye project over if necessary and apply dye to the other half of the project. Probably the most common tie dye shirt look is a pattern that makes a swirl. Prepare the Shirt Dyes.
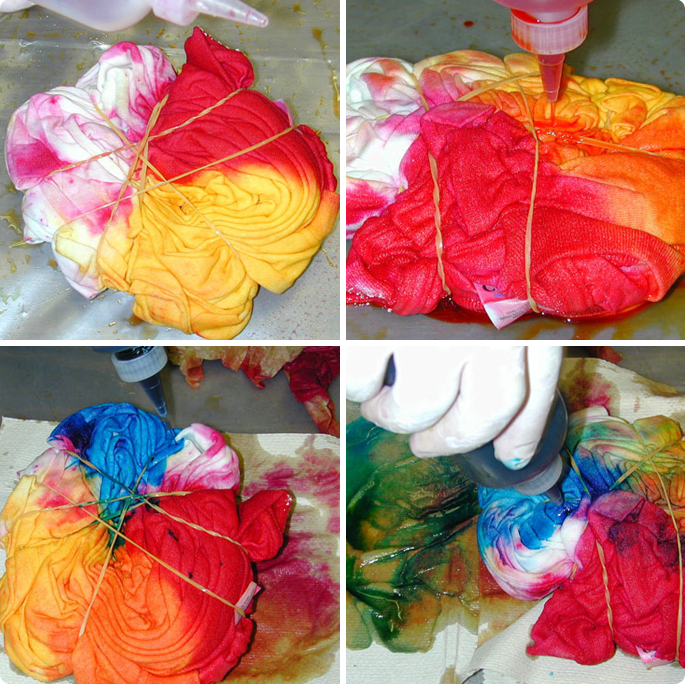
Read our step-by-step guide here and quickly become a pro. Place project in a plastic bag and leave overnight. Take more than a few rubber bands and tie them tightly into quadrants.
Continue to crumple the shirt randomly. Lay the t-shirt flat. As you get to the end the fabric wont naturally just lay in the spiral.
Begin twisting the fabric in a circular motion and continue until all of the fabric is in a spiral shape. Begin by tugging up small sections of the t-shirt between your thumb and forefinger. Twist until the folds in the shirt form a circle.
Now is the time to put on those plastic or rubber gloves. Put your rubber gloves on pick the dye and saturate each quadrant. This method is similar to the traditional tie-dying method but it does not require hot water or as much preparation as the traditional method.
Pull out the shirts little pieces by pinching your fingers to bring the shirt up to where you will apply the dye. Tie dying your hands might sound cool but any contact of skin with chemicalseven if non-toxicis never a good idea. Set Up Your Space.
How to Tie Dye a T-Shirt. Like the name indicates you can make designs that resemble geodes but you can also make anything from small polka dots to large concentric circles. Prepare the Shirt Dyes.
Make sure your rubber bands are not too tight. Fold up the bottom edge of the t-shirt a few centimetres then fold it under in a concertina motion. Tie dye patterns to try Stripes Lay the t-shirt out flat.
Spiral Tie Dye Pattern Watch later Watch on Use rubber bands to hold the design in place. Choose Your Technique Tie Up Your Shirt. The shirt will need to dry but once you heat-set it by tossing it into the drier it will be ready to be worn.
Grab your tie dye project and put it into your plastic Ziploc bag and let it sit overnight. Many tie-dye kits will come with something called soda ash solution for this step but you can use lukewarm water or a homemade solution thats one part water one part vinegar start with a cup of. Continue tying off the circles all over the t-shirt like this.
Pinch the fabric in the center. After scrunching up your shirt lay it on a wire rack thats over a sink or bucket cover the shirt in ice cubes and sprinkle the dye powder over the ice. First you prepare your garment by gathering the fabric in the desired places and tying it with the parcel cord.
The more string you use the more parts of the shirt will remain in the original color after dyeing. You can tie-dye your shirt using watered-down acrylic paint. The last step is to apply dye only.
Using an elastic band or a piece of string wrap around the circular section tightly and knot to secure in place. The first of the 5 ways in how to tie dye we will start off with is the basic single spiral. To make the swirl design start out with your pre-soaked T-shirt lying flat on a covered surface.
Spiral Tie Dye Pattern To achieve the spiral pattern simply start by pinching your thumb and index fingers on the shirt and twisting. Ill show you how to make all sorts of tie-dye designs including the crumple technique the spiral pattern and the bullseye design. Our latest beginners guide teaches you how to tie-dye T-shirts at home.
How To Make Tie Dye At Home My Step By Step Experience Chatelaine
Simple Tie Dye Shirt Directions With Clipart By Yana Gurova Tpt
How To Tie Dye Easy Techniques For Beginners Sarah Maker

How To Tie Dye Best Tutorial For Beginners Treasurie
/how-to-tie-dye-1245650_Final-5bbd0c65c9e77c005897b360.png)
How To Make Tie Dye Clothes And Crafts
How To Tie Dye A Shirt With A Classic Spiral Pattern

How To Tie Dye A T Shirt In Six Easy Steps

30 Easy Diy Summer Fashion Ideas With Step By Step Tutorials Diy Tie Dye Shirts Tie Dye Kit Tie Dye Crafts

How To Tie Dye An Old White Shirt 14 Steps With Pictures Instructables


Comments
Post a Comment